UtilitiesJupyter
Findings in quantitative disciplines have historically been communicated primarily through written reports. In many cases, accompanying code is unavailable or difficult to replicate for readers who might wish to reproduce the analysis. This dissociation of exposition and code has major drawbacks: (i) ease of replication has significant implications for the
Project Jupyter provides researchers with tools for combining exposition and code into a single document called a Jupyter notebook. Notebook files are managed by a command line program called jupyter and are presented to the user for viewing and editing in their preferred web browser. A Jupyter notebook contains of a list of cells, each of which is either a Markdown cell for exposition or a code cell for execution. The code is passed by Jupyter to a program called a kernel which runs in the background. The default kernel is a Python interpreter, but kernels are available for a huge variety of languages (including Julia and R, which, along with Python, form the portmanteau Jupyter).
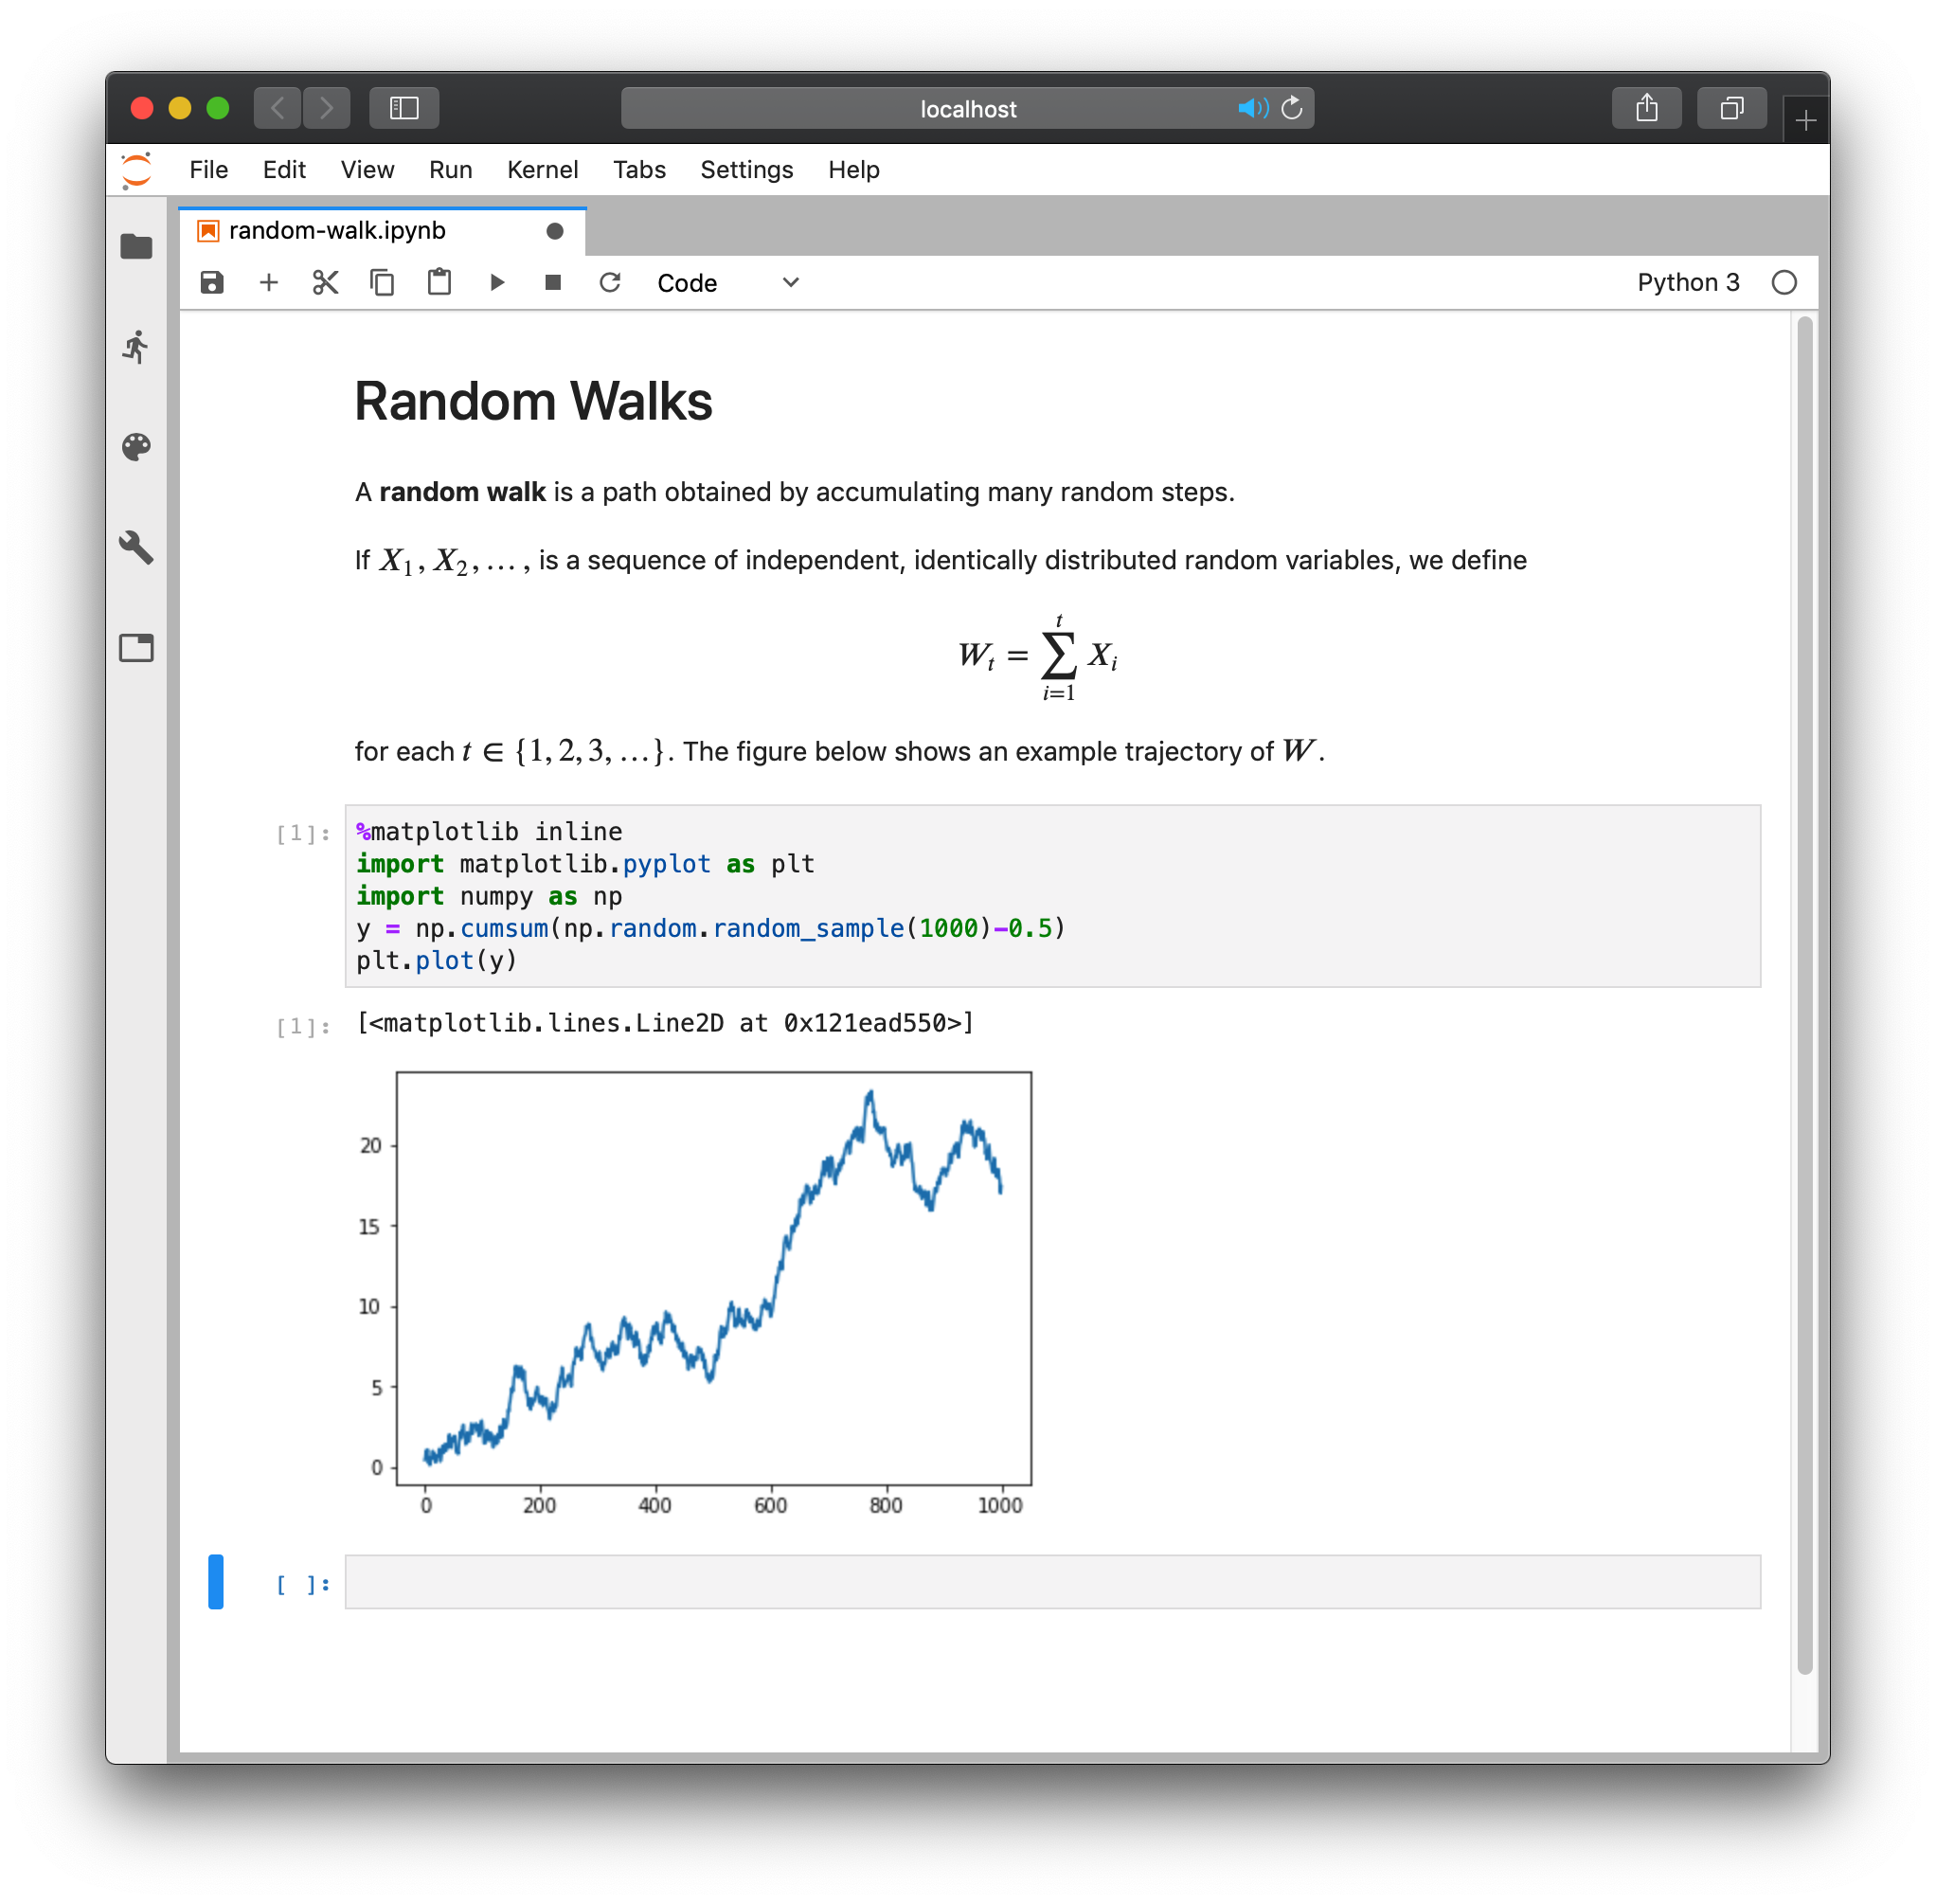
Many rich code cell output types are supported, including both static and interactive graphics which appear in the notebook. Here's an example session:

Project Jupyter is currently in a period of transition from the Classic Jupyter Notebook to JupyterLab. JupyterLab is the next-generation version of Jupyter Notebook, built from scratch using more modern web tools and years of insight gained from the development of the classic notebook. We recommend using JupyterLab, although you might occasionally come across features which are available only in the Classic Notebook. The underlying file format is the same, so you can use the two interfaces interchangeably.
Magic Commands
You might have noticed that one line in the executable cell in the screenshot above is not valid Python: %matplotlib inline. This instruction, which makes matplotlib figures appear directly in the notebook, is specific to the Jupyter interface and is not part of matplotlib itself. Such instructions are called magic commands and are indicated in Python with a leading percent sign.
Here are some handy magic commands:
%run. If you have a large or ungainly block of code that you don't want taking up space in your notebook, you can save it in a.pyfile in the current directory and use the%runmagic to execute all of the code in that file.
%timeit. Place this line in front of any line of Python code to approximate how long it takes to execute.
%debug. Running this magic after a cell returns an error puts you into a debugger session with the interpreter paused at the point where the error was thrown. This allows you to inspect the values of variables, try new code, and step through the execution of your program one line at a time.
%%load_ext autoreload. If theautoreloadextension is loaded, then any changes in imported modules are automatically picked up whenever a cell is executed. This can be helpful if you want to alternate between making changes to a module and experimenting with them in a Jupyter notebook. The alternative is to re-start the kernel each time you make a change to the module, and that gets rather tedious.
Keyboard Shortcuts
Jupyter notebooks can be navigated entirely by mouse or trackpad, but it is much more efficient to use keyboard shortcuts for common operations. Furthermore, it's worth learning many of these shortcuts before working extensively with the software, because it's easier to build good habits from the start than to replace bad habits one at a time as your frustration with inefficiencies reaches the limits of what you can tolerate.
Jupyter has an edit mode for entering text in cells and a command mode for manipulating cells (for example, merging or deleting cells). If there's a blinking cursor in a cell, the current mode is edit, and otherwise the current mode is command. Switching between modes is accomplished with the escape key (edit to command mode) and the enter key (command to edit mode).
Cells are deleted in command mode with two strokes of the d key. You can highlight cells in command mode by holding shift and using your arrow keys, and you can merge the highlighted cells into a single cell using shift-m. Insertion of new cells is accomplished with either a (insert cell above ) or b (insert cell below ) in command mode. Cells can be switched between Markdown (m) and code (y) in command mode.
The most important shortcut works the same in both modes: shift-enter executes the current cell or cells.
If you want to perform an action that you don't know a keyboard shortcut yet, you can do cmd-shift-c (in either mode) to activate the command palette. Then start typing keywords related to what you want to accomplish, selected the desired command, and run it by pressing enter. The command palette will also display the shortcut for that command (if one exists). The sequence cmd-shift-f-f closes the command palette.
Exercise
- The most efficient way to delete a cell is to find the delete operation in a menu somewhere.
- You can reminder yourself of a given keyboard shortcut by searching for that operation in the command palette.
- The enter key switches from edit mode to command mode.
Notebook Consoles
One difficulty with Jupyter notebooks is that it's easy for your workspace to get cluttered. The problem is that all code in the notebook is handled in the same way regardless of its role:
- Publication code. Code that contributes to the narrative should be included in the final Jupyter notebook.
- Library code. Long functions may be critical for the code in the notebook to run properly, but they occupy a lot of vertical space in the notebook and often distract from the narrative.
- Scratch code. While executing throwaway lines of scratch code is an important part of the development process, that code doesn't logically belong in the notebook.
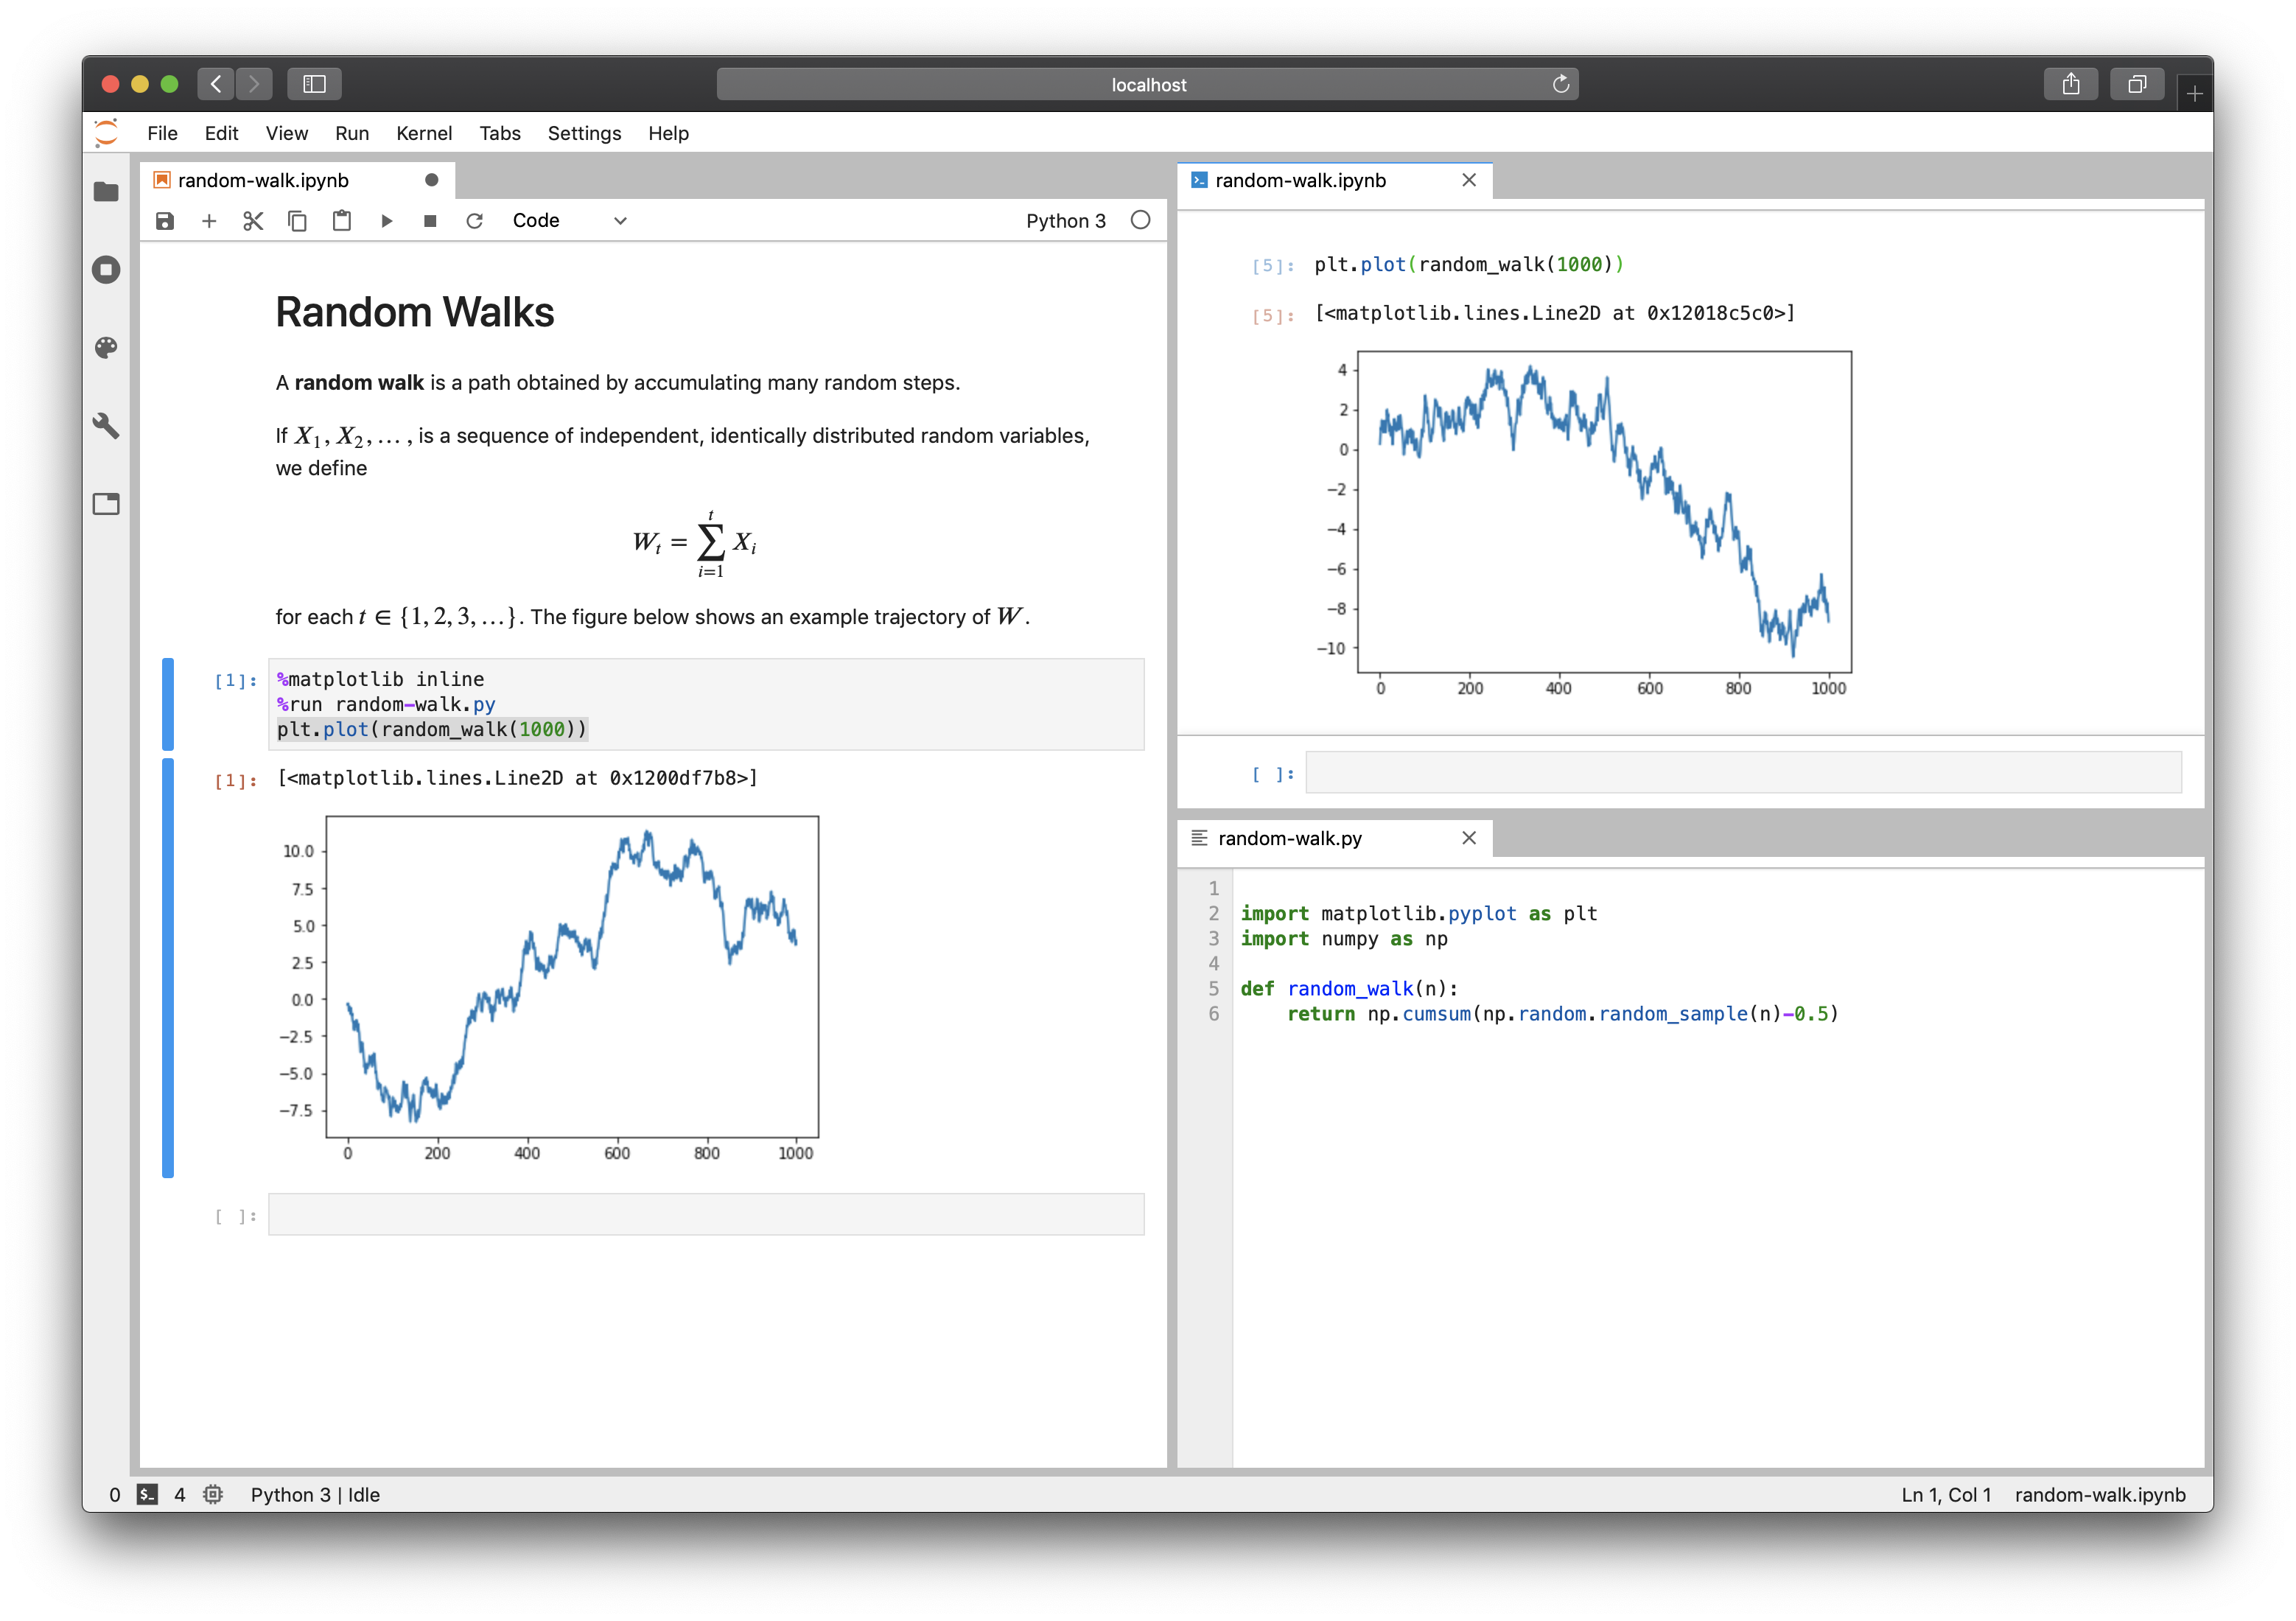
JupyterLab includes functionality for interacting with all three types of code in a manner appropriate to their roles. The idea is to open three tabs: a Jupyter notebook for publication code, a Python text file for library code, and a console linked to the notebook for scratch code. The linked console is a

To achieve this setup in JupyterLab, begin by opening a Jupyter notebook and a text file saved with the .py extension. Then right-click the tab for the Jupyter notebook and select "New console for notebook". You can drag each tab to wherever you want it to appear on the screen, and all of them are visible at once. The combinations ctrl-shift-[ and ctrl-shift-] switch between tabs.
Exercise
If you bind the value 7 to the variable x in your Jupyter notebook, then the value of x in the linked console will be x in a Python file in the same directory will be